
Merajut Seamless Cable Pullover
Workshop Online membuat sweater pullover motif cable dengan pilihan panjang body sesuai keinginan, 3 jenis pilihan pinggiran leher, serta 4 macam model penyelesaian lengan dengan motif lengan bebas
2 bab · 9 video · 13 menit
Daftar isi
Video bisa dibuka satu per satu. Materi dan latihan dikerjakan di antara video, tanpa halaman sendiri.
Bab 01 Material 0 video
1.1 Material
NOTE = Print the CABLE CHART of this PDF (attached) on a big piece of paper before working. (Cetak PDF pola cable chart (terlampir) pada selembar kertas besar sebelum memulai merajut)❗❗❗
- Detail Material Materi
Lihat isi materi
🔹Yarn = at least 500 meters of bulky weight yarns. For the tunic length version and long sleeves, the estimation of yarn
needed is 1000 meters. (sample with waist length and half-length sleeves version using 496 meters/431 grams of Milkco 6ply made in China 115m/100 grams)
🔹Finished size = One size fit XXL = bust 110cm (stretchable) length 50 cm (waist length)/70 cm (tunic length). No seaming!
🔹Materials = 80 cm and 30/40 cm circular needle 6 mm, 30 cm, and 60 cm Circular needle OR DPN 5.5 mm (for brim), (optional) DPN 6 mm, 7 mm needle (for 3 needles bind off), medium size cable needle, several stitch holders, several pins and lock stitch markers to easier your work (use when you feel you need it).
🔹Gauge = 10 cm = 14.5 sts/21 rows in stockinette with 6mm
🔲Abbreviation (open search engine or YouTube for more details) =
▪️sts = stitches
▪️CO = cast on
▪️K = Knit
▪️P = Purl
▪️YO = yarn over
▪️BO = Bind off
▪️K2Tog = knit 2 sts together
▪️P2Tog = purl 2 sts together
▪️SSK = slip knitwise twice, return 2 sts into the left needle, K2tog through back loop
▪️SSP = slip knitwise twice, return 2 sts into the left needle, P2tog through back loop
▪️Sl = slip
▪️RS = right side
▪️WS = wrong side
▪️Wrap and turn
▪️Purlwise = as if to purl
▪️LN = left needle
▪️2/2 LC =
-In knit side: slip 2 sts into cable needle, put in front of work, K2, then K2 from cable needle.
-In purl side: slip 2 sts into cable needle, put in front of work, P2, then P2 from cable needle.
▪️2/2 RC =
-In knit side: slip 2 sts into cable needle, put in back of work, K2, then K2 from cable needle.
-In purl side: slip 2 sts into cable needle, put in back of work, P2, then P2 from cable needle.
▪️4/3 LC = slip 4 sts into cable needle, put in front of work, K3, then K4 from cable needle.
▪️3/4 RC = slip 3 sts into cable ne
Bab 02 Pattern Pattern ini terdiri dari tutorial beberapa part yang perlu dikerjakan. Lakukan instruksi sesuai part yang diberikan 9 video · 13 menit
2.1 SPLITTED BRIM PART
- Instruksi Dasar Lakukan instruksi berikut untuk mengerjakan part ini Materi
Lihat isi materi
✴️MAKE TWO✴️
🔷With a smaller needle (5.5 mm/US 9), cast on 80 sts, work back and forth.
▪️RS = K4, [K1,P1] repeat until 4 sts remaining, K4
▪️WS = P4, [K1,P1] repeat until 4 sts remaining, P4
Repeat 2 row above total 5 times (5cm)
🔷Change to a bigger needle (6 mm), and still work back and forth.
▪️Start to follow chart 1-12 – 92 sts total. (LOWER BODY PART IN CABLE CHART)❗❗❗
▪️Cut yarn. Put the work aside into the holder
🔷Make once more identical (do not cut the yarn on the second piece) – 2 pieces in total
***
🟡Put both pieces into one 80 cm circular needle 6 mm (US 10), with WS facing each other. Start working in round.
▪️Start to follow chart 13 (twice) – 188 sts total.
▪️Start to follow chart 14-18 (twice)
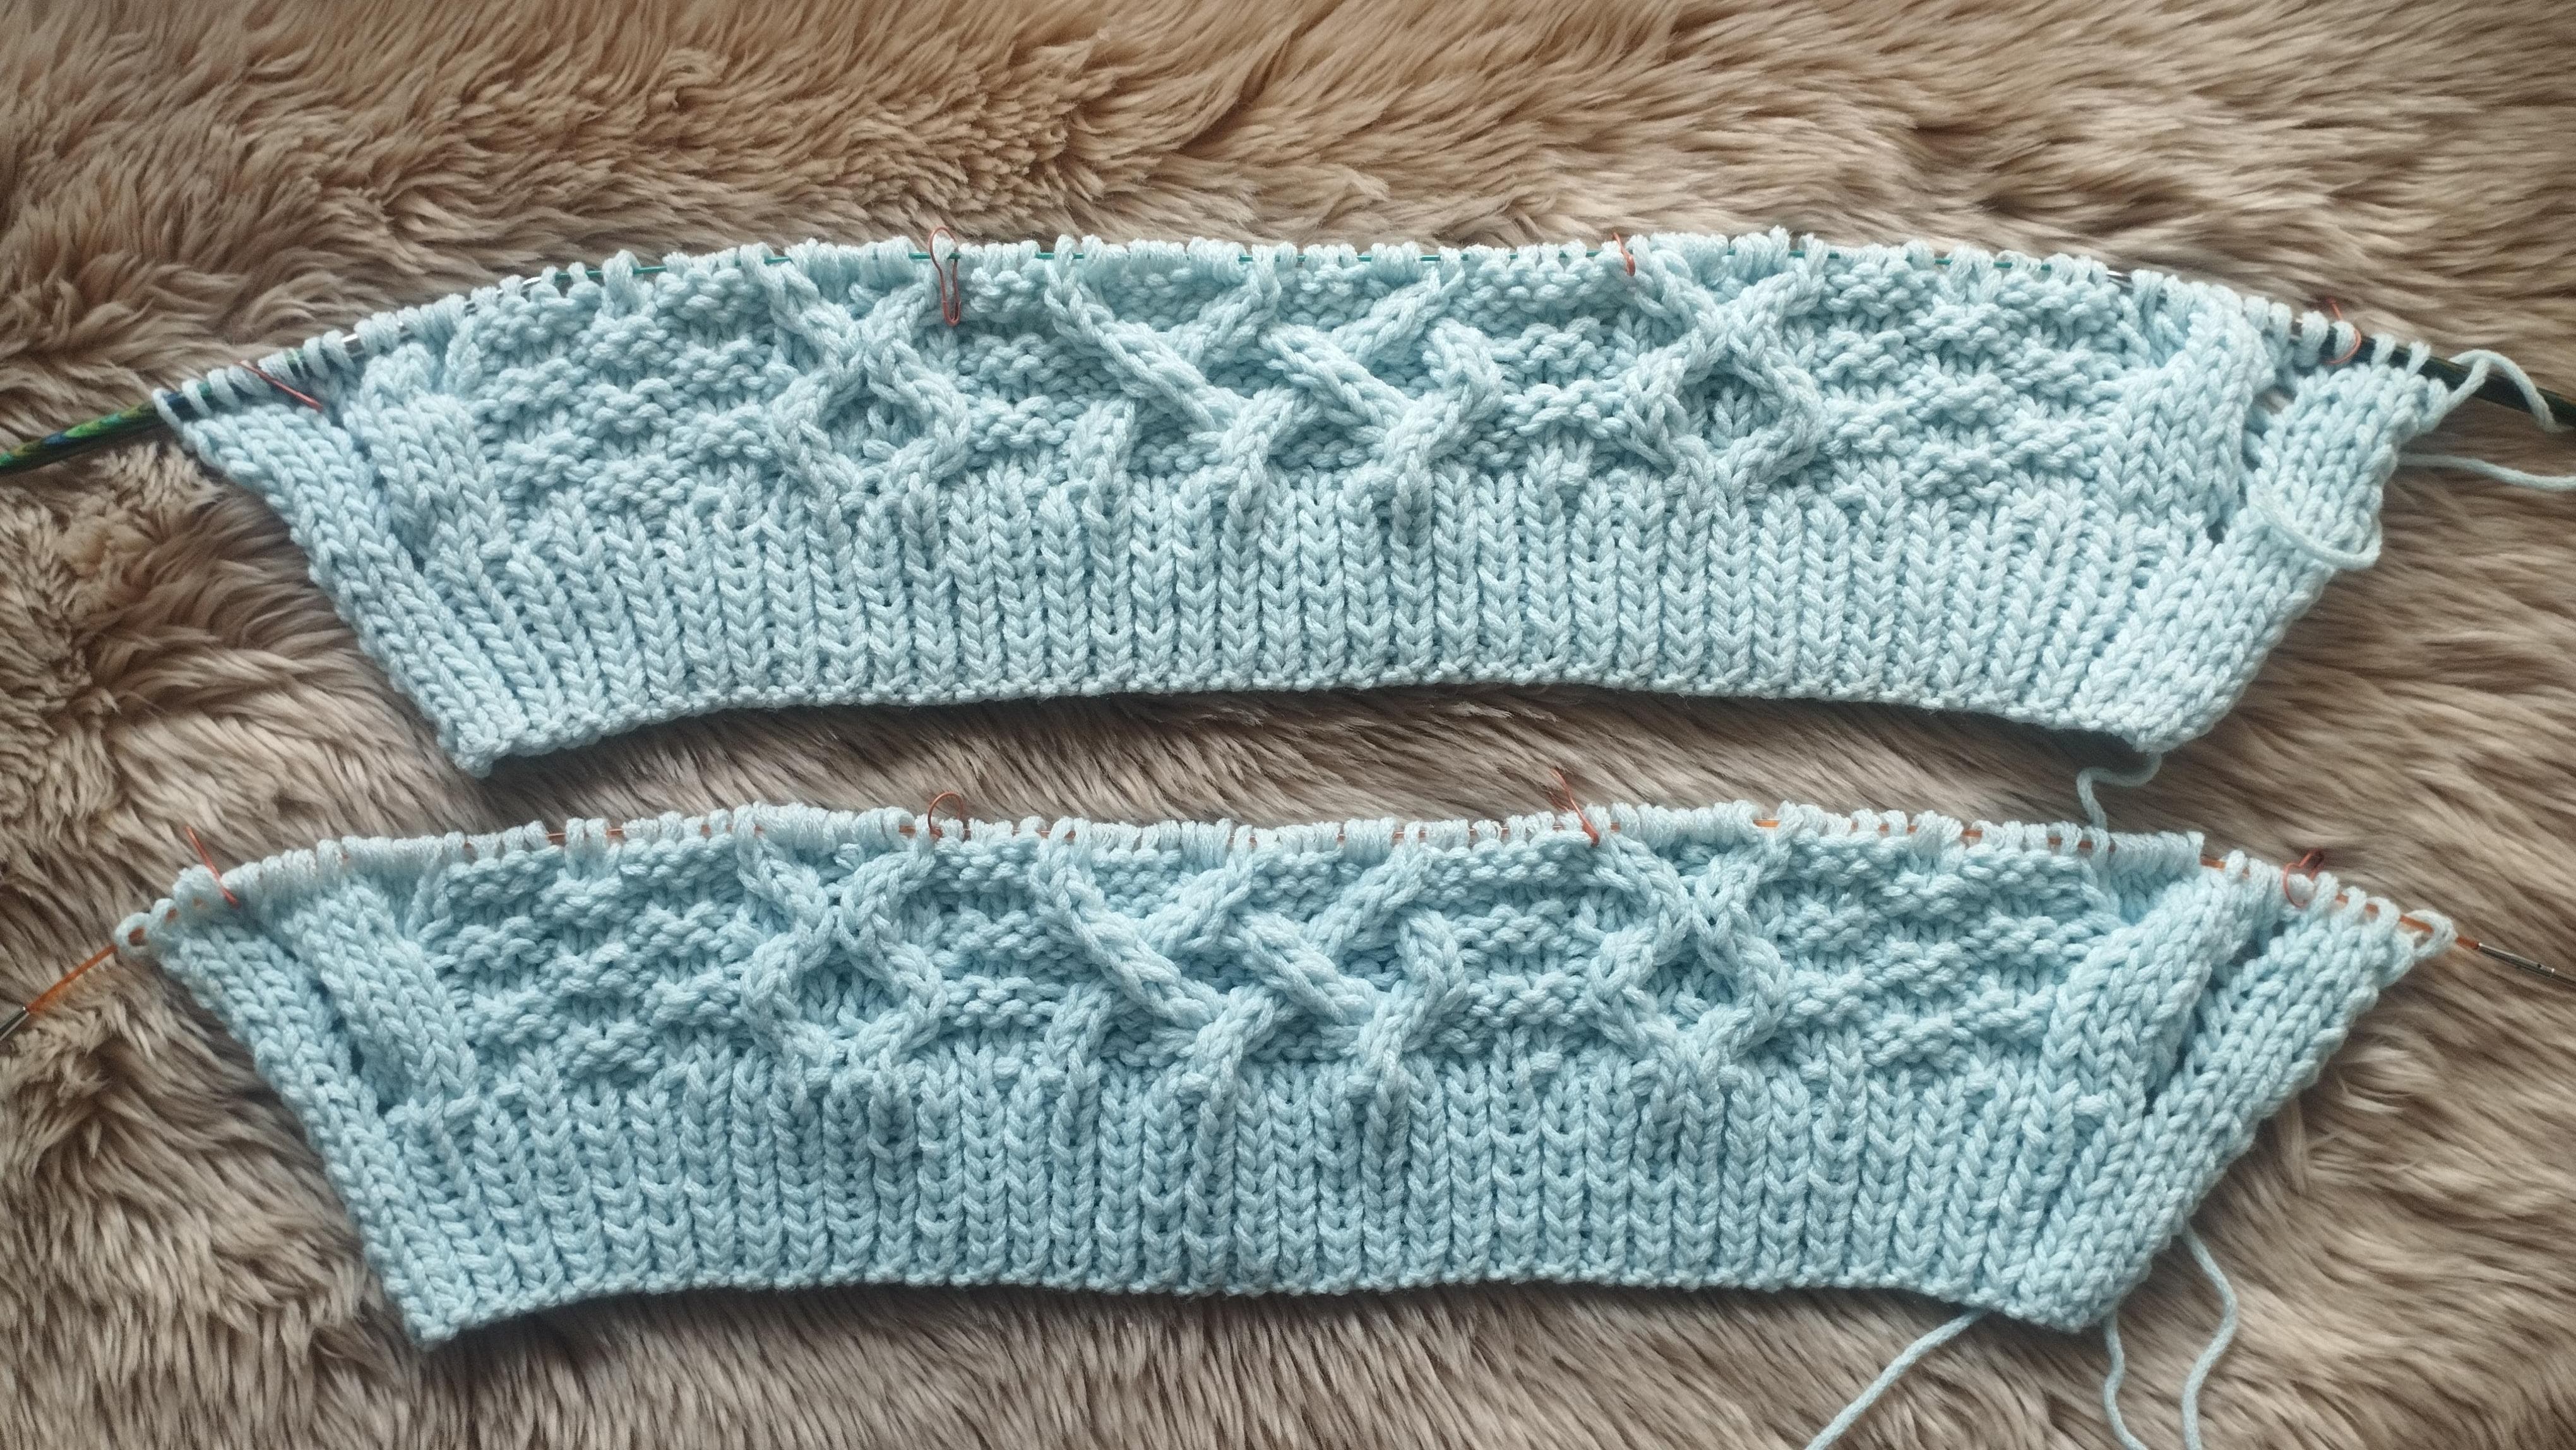
Ilustrasi: Two Splitted Brim
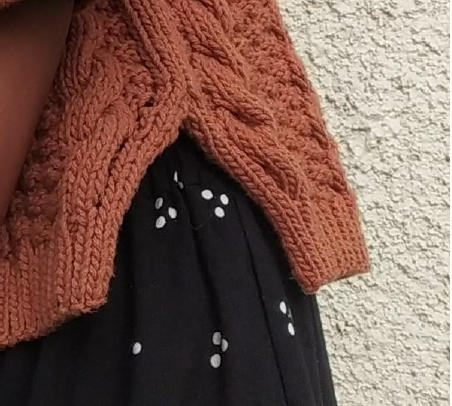
Ilustrasi Splitted Brim Part
Catatan:
Video Tutorial teknik cable bisa dilihat di pada video-video yang terlampir. - Pola Splitted Brim Part Berikut adalah pola tertulis untuk "Splitted Brim Part" Materi
Lihat isi materi
BACK AND FORTH
R1: K4 (YO K3 P1 K2 P4 K2 P1 K4 P1 K4 P1 K2 P1 K20 P1 K2 P1 K4 P1 K4 P1 K2 P4 K2 P1 K3 YO) K4
R2: P4 (P4 K1 P2 K4 P2 K1 P4 K1 P4 K1 P2 K1 P2 K4 P4 K4 P4 K3 P2 K1 P4 K1 P4 K1 P2 K4 P2 K1 P4) P4
R3: K4 (YO K4 P4 K2 P4 2/2RC P1 2/2LC P6 2/2RC P4 2/2RC P4 K2 P4 2/2RC P1 2/2 LC P4 K2 P4 K4 YO) K4
R4: P4 (P5 K4 P2 K4 P4 K1 P4 K4 P2 K4 P4 K4 P4 K6 P4 K1 P4 K4 P2 K4 P5) P4
R5: K4 (YO K5 P1 K2 P4 K2 P1 K4 P1 K4 P1 K2 P1 2/2RC 2/2LC 2/2RC 2/2LC 2/2RC P1 K2 P1 K4 P1 K4 P1 K2 P4 K2 P1 K5 YO) K4
R6: P4 (P6 K1 P2 K4 P2 K1 P4 K1 P4 K1 P2 K3 P4 K4 P4 K4 P2 K1 P2 K1 P4 K1 P4 K1 P2 K4 P2 K1 P6) P4
R7: K4 (YO K6 P4 K2 P4 2/2LC P1 2/2RC P4 K2 P4 2/2LC P4 2/2LC P6 2/2LC P1 2/2RC P4 K2 P4 K6 YO) K4
R8: P4 (P7 K4 P2 K4 P4 K1 P4 K6 P4 K4 P4 K4 P2 K4 P4 K1 P4 K4 P2 K4 P7) P4
R9: K4 (YO 3/4RC P1 K2 P4 K2 P1 K4 P1 K4 P1 K2 P1 2/2LC 2/2RC 2/2LC 2/2RC 2/2LC P1 K2 P1 K4 P1 K4 P1 K2 P4 K2 P1 4/3LC YO) K4
R10: P4 (P8 K1 P2 K4 P2 K1 P4 K1 P4 K1 P2 K1 P2 K4 P4 K4 P4 K3 P2 K1 P4 K1 P4 K1 P2 K4 P2 K1 P8) P4
R11: K4 (YO K8 P4 K2 P4 2/2RC P1 2/2LC P6 2/2RC P4 2/2 RC P4 K2 P4 2/2RC P1 2/2LC P4 K2 P4 K8 YO) K4
R12: P4 (K1 P8 K4 P2 K4 P4 K1 P4 K4 P2 K4 P4 K4 P4 K6 P4 K1 P4 K4 P2 K4 P8 K1) P4
START IN A ROUND
R13: K4 (YO P1 K8 P1 K2 P4 K2 P1 K4 P1 K4 P1 K2 P1 2/2 RC 2/2LC 2/2RC 2/2LC2/2RC P1 K2 P1 K4 P1 K4 P1 K2 P4 K2 P1 K8 P1 YO) K4
R14: K4 (K1 P1 K8 P1 K2 P4 K2 P1 K4 P1 K4 P1 K2 P1 K2 P4 K4 P4 K4 P3 K2 P1 K4 P1 K4 P1 K2 P4 K2 P1 K8 P1 K1) K4
R15: K2TOG K2 (YO P2 K8 P4 K2 P4 2/2LC P1 2/2RC P4 K2 P4 2/2LC P4 2/2LC P6 2/2LC P1 2/2RC P4 K2 P4 K8 P2 YO) K2 SSK
R16: K3 (P3 K8 P4 K2 P4 K4 P1 K4 P4 K2 P4 K4 P4 K4 P6 K4 P1 K4 P4 K2 P4 K8 P3) K3
R17: K2TOG K1 (YO K2 P1 4/4RC P1 K2 P4 K2 P1 K4 P1 K4 P1 K2 P1 2/2LC 2/2RC 2/2LC 2/2RC 2/2LC P1 K2 P1 K4 P1 K4 P1 K2 P4 K2 P1 4/4LC P1 K2 YO) K1 SSK
R18: K2 (P1 K2 P1 K8 P1 K2 P4 K2 P1 K4 P1 K4 P1 K2 P3 K4 P4 K4 P4 K2 P1 K2 P1 K4 P1 K4 P1 K2 P4 K2 P1 K8 P1 K2 P1) K2
CABLE ABBREVIATION
• 2/2 LC =
− In knit side: slip 2 sts into cable needle, put in front of work, K2, then K2 from
cable needle.
− In purl side: slip 2 sts into cable needle, put in front of work, P2, then P2 from
cable needle.
• 2/2 RC =
− In knit side: slip 2 sts into cable needle, put in back of work, K2, then K2 from
cable needle.
− In purl side: slip 2 sts into cable needle, put in back of work, P2, then P2 from
cable needle.
• 4/3 LC = slip 4 sts into cable needle, put in front of work, K3, then K4 from
cable needle.
• 3/4 RC = slip 3 sts into cable needle, put in back of work, K4, then K3 from
cable needle.
• 4/4 LC =
− In knit side: slip 4 sts into cable needle, put in front of work, K4, then K4 from
cable needle.
− In purl side: slip 4 sts into cable needle, put in front of work, P4, then P4 from
cable needle.
• 4/4 RC =
− In knit side: slip 4 sts into cable needle, put in back of work, K4, then K4 from
cable needle.
− In purl side: slip 4 sts into cable needle, put in back of work, P4, then P4 from
cable needle.

Ilustrasi Lower Body Part
- Video Tutorial: 4/4 LC (Left Cable) Video tutorial on how to do 4/4 left cable 1:09
- Video Tutorial: 4/4 RC (Right Cable) Video tutorial on how to do 4/4 right cable needle. 1:24
- Video Tutorial: SSK (Slip Slip Knit) Video Tutorial: SSK (Slip Slip Knit) 0:21
- Video Tutorial: K2Tog (Knit 2 sts together) Video Tutorial: K2Tog (Knit 2 sts together) 0:21
- Video Tutorial: 4 Jenis Yarn Over Video Tutorial: 4 Jenis Yarn Over 4:58
2.2 Main Body Part
- Instruksi Dasar Lakukan instruksi berikut untuk mengerjakan part ini Materi
Lihat isi materi
🟡Continue work in round, work the Main Pattern on the chart that you printed previously (don’t forget to work the chart twice each round) until you get 25 cm height from when you start work in round. End after you work an odd number of rounds ❗❗❗
🔻Note: for the tunic length version, continue work until you get 40 cm. You can also determine the body length according to your wishes, it doesn't have to be 25 or 40 cm long🔺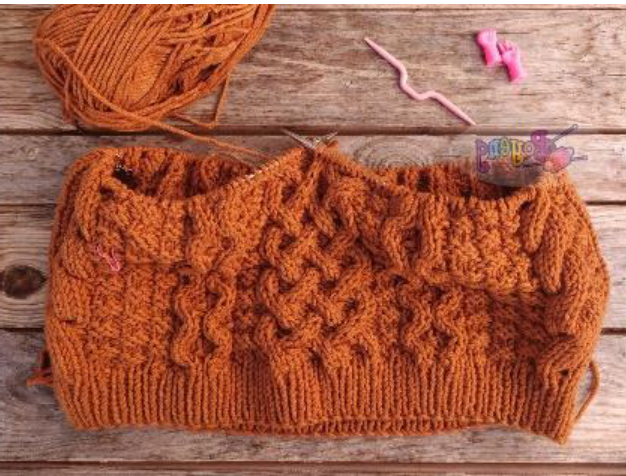
Ilustrasi Main Body Part
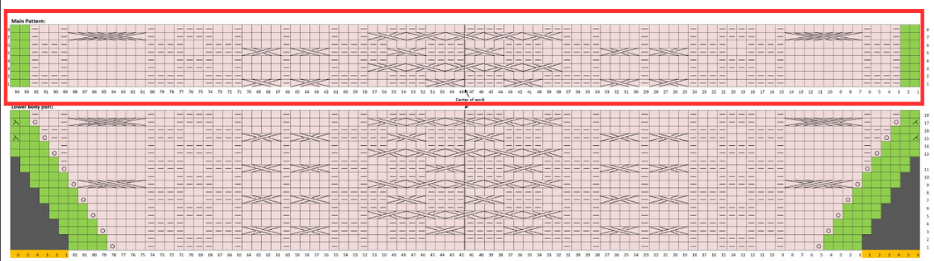
Ilustrasi Main Chart
BODY CHART
R1: K2 (P4 K8 P4 K2 P4 2/2RC P1 2/2LC P6 2/2RC P4 2/2RC P4 K2 P4 2/2RC P1 2/2LC P4 K2 P4 K8 P4) K2
R2: K2 (P4 K8 P4 K2 P4 K4 P1 K4 P6 K4 P4 K4 P4 K2 P4 K4 P1 K4 P4 K2 P4 K8 P4) K2
R3: K2 (P1 K2 P1 K8 P1 K2 P4 K2 P1 K4 P1 K4 P1 K2 P1 2/2RC 2/2LC 2/2RC 2/2LC 2/2RC P1 K2 P1 K4 P1 K4 P1 K2 P4 K2 P1 K8 P1 K2 P1) K2
R4: K2 (P1 K2 P1 K8 P1 K2 P4 K2 P1 K4 P1 K4 P1 K2 P1 K2 P4 K4 P4 K4 P3 K2 P1 K4 P1 K4 P1 K2 P4 K2 P1 K8 P1 K2 P1) K2
R5: K2 (P4 K8 P4 K2 P4 2/2LC P1 2/2RC P4 K2 P4 2/2LC P4 2/2LC P6 2/2LC P1 2/2RC P4 K2 P4 K8 P4) K2
R6: K2 (P4 K8 P4 K2 P4 K4 P1 K4 P4 K2 P4 K4 P4 K4 P6 K4 P1 K4 P4 K2 P4 K8 P4) K2
R7: K2 (P1 K2 P1 4/4RC P1 K2 P4 K2 P1 K4 P1 K4 P1 K2 P1 2/2LC 2/2RC 2/2LC 2/2RC 2/2LC P1 K2 P1 K4 P1 K4 P1 K2 P4 K2 P1 4/4LC P1 K2 P1) K2
R8: K2 (P1 K2 P1 K8 P1 K2 P4 K2 P1 K4 P1 K4 P1 K2 P3 K4 P4 K4 P4 K2 P1 K2 P1 K4 P1 K4 P1 K2 P4 K2 P1 K8 P1 K2 P1) K2
- Video Tutorial: 4/4 LC (Left Cable) 1:09
- Video Tutorial: 4/4 RC (Right Cable) Video Tutorial: 4/4 RC (Right Cable) 1:24
2.3 Back Side
- Instruksi Dasar Lakukan instruksi berikut untuk mengerjakan part ini Materi
Lihat isi materi
🟡Start to work back and forth with half of the total sts (94 sts), beginning with WS. (put the other half 94 sts into
stitch holder to work later). Turn work before you start so WS is towards you.
🔹WS = CO1 (using simple/cable cast on/M1), continue pattern – 95 sts
🔹RS = CO1 (using simple/cable cast on/M1), continue pattern – 96 sts
🔺Do these 2 rows (WS and RS) just one time🔺
🟡Continue the pattern back and forth until 18 cm (39 rows). End in WS❗
🔴We will now work each shoulder separately🔴 - Pola Back Side Part Materi
Lihat isi materi
BACK & FORTH BODY PART
Pola tertulis bagian ini hanya membantu cara membaca dalam pengerjaan bolak balik yang disesuaikan dengan pola baris. Bukan berarti memulai pengerjaan dari R1, melainkan tetap disesuaikan dengan kondisi rajutan masing-masing sudah sampai pada pola baris ke berapa dalam melanjutkan pola setelah MAIN BODY PART. Perlu diingat, pengerjaan MAIN BODY PART diakhiri dengan Baris Ganjil. Oleh karena itu, pengerjaan BACKSIDE maupun FRONTSIDE dimulai dari pola Baris Genap dengan memperhatikan akhir MAIN BODY PART berhenti di baris ganjil nomer berapa.
Pada pola chart, awal dan akhir hanya 2 sts saja (K2 atau P2). Pada pola ini sudah kami tuliskan menjadi 3 sts (K3 atau P3) karena sudah disesuaikan dengan penambahan 1 tusuk pada masing-masing 2 baris awal, sehingga lakukanlah penyesuaian pada saat pengerjaan 2 baris awal saat penambahan tusukan.
R1: K3 (P4 K8 P4 K2 P4 2/2RC P1 2/2LC P6 2/2RC P4 2/2RC P4 K2 P4 2/2RC P1 2/2LC P4 K2 P4 K8 P4) K3
R2: P3 (K4 P8 K4 P2 K4 P4 K1 P4 K4 P2 K4 P4 K4 P4 K6 P4 K1 P4 K4 P2 K4 P8 K4) P3
R3: K3 (P1 K2 P1 K8 P1 K2 P4 K2 P1 K4 P1 K4 P1 K2 P1 2/2RC 2/2LC 2/2RC 2/2LC 2/2RC P1 K2 P1 K4 P1 K4 P1 K2 P4 K2 P1 K8 P1 K2 P1) K3
R4: P3 (K1 P2 K1 P8 K1 P2 K4 P2 K1 P4 K1 P4 K1 P2 K3 P4 K4 P4 K4 P2 K1 P2 K1 P4 K1 P4 K1 P2 K4 P2 K1 P8 K1 P2 K1) P3
R5: K3 (P4 K8 P4 K2 P4 2/2LC P1 2/2RC P4 K2 P4 2/2LC P4 2/2LC P6 2/2LC P1 2/2RC P4 K2 P4 K8 P4) K3
R6: P3 (K4 P8 K4 P2 K4 P4 K1 P4 K6 P4 K4 P4 K4 P2 K4 P4 K1 P4 K4 P2 K4 P8 K4) P3
R7: K3 (P1 K2 P1 4/4RC P1 K2 P4 K2 P1 K4 P1 K4 P1 K2 P1 2/2LC 2/2RC 2/2LC 2/2RC 2/2LC P1 K2 P1 K4 P1 K4 P1 K2 P4 K2 P1 4/4LC P1 K2 P1) K3
R8: P3 (K1 P2 K1 P8 K1 P2 K4 P2 K1 P4 K1 P4 K1 P2 K1 P2 K4 P4 K4 P4 K3 P2 K1 P4 K1 P4 K1 P2 K4 P2 K1 P8 K1 P2 K1) P3
2.4 Back Right Side
- Instruksi Dasar Lakukan instruksi berikut untuk mengerjakan part ini Materi
Lihat isi materi
✴️NECK BACK RIGHT SIDE✴️
Move 37 sts in on stitch holder and then 22 sts in the other stitch holder (start from the opposite side of you working needle) – 37 sts remain on the working needle
🔹RS = follow the pattern until 3 sts remaining, Slip 1 purlwise, pass last st over 2nd st (like BO), put back slipped st to LN (Left Needle), K2tog – 35 sts
🔹Follow the next pattern (cable chart) for 2 rows (one WS and one RS).
🔴Note: always purl the first st on WS and knit the last st on RS🔴
✴️SHOULDER BACK RIGHT SIDE✴️
🔹WS = follow the pattern until 9 sts remaining, wrap and turn
🔹RS = follow pattern
🔹WS = follow the pattern until 17 sts remaining, wrap and turn
🔹RS = follow pattern
🔹WS = follow the pattern until 26 sts remaining, wrap and turn
🔹RS = follow pattern
🔻Leave 5 times the shoulder length of scarp yarn before you cut it. Leave the work in a stitch holder or spare 6mm (US 10) needle for bind-off later🔺 - Video Tutorial: 4/4 LC (Left Cable) Video Tutorial: 4/4 LC (Left Cable) 1:09
- Video Tutorial: 4/4 RC (Right Cable) Video Tutorial: 4/4 RC (Right Cable) 1:24